Well it was what got me into card making in the first place!
I created the soft pink flower background paper using the Build a Bloom stamp set and used a message from the Cupcakes stamp set with the tiny daisy from build a bloom. 
I stamped three different cupcakes, coloured them in with the Copic pens and cut them out and layered them onto part of a scallop edge card. I inked around the edge and attached it to the card with foam pads.
I finished the card with glitter glue - just because I love it.
If you like this card you can get the stamp set from Craftwork Cards - Cupcakes
Another card made using the piece of stamped paper, this time I cut little squares, I didnt have enough paper to cut 9 squares so I added a message in the centre.

All the squares were edged with glitter glue for added sparkle.
Well thats it for my Build a Bloom cards, hope you liked them and that they inspire you to buy the stamp set and get busy!
I stamped another background paper, the same daisy as the orange card but touching the petals so that they are all linked together.
I masked the centre square of the card, edged it with glitter glue and added my favourite In Circle messages.

Crystals fill the centres of all the flowers, a little excessive perhaps but it looks gorgeous! I added little dots of glitter glue to the flowers too.
I cant believe it!!
Week 4 - DONE
Only 48 weeks to go!
A bright and bold card today. I stamped some paper with the daisy and coloured it with bright orange Copic pens. I added the 3 dots between the flowers.

I cut the paper to size and layered it onto a scallop edged card. I cut a small panel of white card, coloured the edges using an inkpad and attached it to the card. Add a layered up message and then cut a strip of white card, wrapped it with ribbon and attached across the front.
 As ever I highlighted the flowers with glitter glue. By adding a panel of white card for the message, it makes its really stand off the busy background of the card.
Another card design tomorrow. See you then.
I started by stamping some stems, then some flowers and colouring them with Copic pens. This is the reason I designed this set - I wanted different stems to put different flower blooms onto.

I then stamped a larger piece of card using one of the messages in the set with a little daisy in between. I coloured the edge of the card so that it lifted it off the base card. Again I stamped onto Softies cardstock.

All layered up onto the card, threaded buttons with ribbon and added crystals to centres of the flowers. Little highlights of glitter glue too - well this is one of my cards!
Another card made using my Build a Bloom stamp set. This card I would happily send to a man, but I would leave the crystals off.
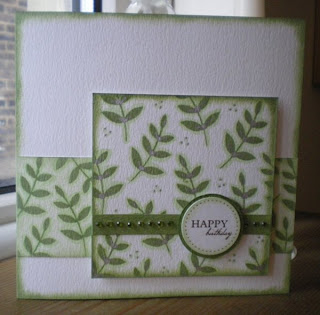 I stamped this square of cardstock - the Softies cardstock from Craftwork Cards which I love - it has a soft texture and gives lovely results when stamped onto.
 I stamped using momento inkpad because I wanted to edge the leaves with colour using my Copic's. I then highlighted the leaves using a Promarker silver pen which is gorgeous. I added some colour around the edge using an inkpad - my favourite Versa Magic chalk pads. I also put the 3 dots between using my Copic pens.More ideas tomorrow, enjoy.
I designed a stamp set called Build a Bloom for Craftwork Cards. I thought it would be good to share some of the cards with you. You may have seen them on Craftwork Cards blog last week as they focussed on the stamp set.I love this set, obviously! and I love what you can create with it.This card has to be my favourite card for quite some time.
 I masked an area on the front of the card using post it notes. Then stamped with momento inkpads and coloured using Copic markers. I tried to join the daisies by touching the petals, which is quite easy as the stamps are clear so you can see where you are stamping.You then have to cut out all the bits between the flowers using a craft knife, this takes a little time, but I think its worth it - I love the effect you get. I actually work with a scalpel which I find so much easier to use than a craft knife. If you are not very good at cutting out with a craft knife I would highly recommend trying a scalpel. I couldnt even cut a straight line with a craft knife and ruler!I inked around the edge of the scallop card and layered an In Circle message up onto a coloured punched circle and scallop circle. I coloured them using my Copic's so that I knew they were the right colour.
 I finished by decorating the centres of the daisies with glitter glue - what else! and I added a dot to the top of each scallop too.Hope you like this idea and will give it a go.More ideas using my Build a Bloom stamp set tomorrow. If you are quick Craftwork Cards have the Build a Bloom set on offer at just £7.50 for 13 stamps.
Next Saturday 30th January 2010 I will be at Craftology shop in Glasgow to demonstrate Craftwork Cards gorgeous new products.Craftology has recently relocated to bigger premises and is holding a big demonstration day. There will be lots of demo's to see and it all starts at 10am.Their address is: 38 Kelvin Avenue, Hillington, Glasgow, G52 4LT and their contact number is 0141 882 1372.Hope to see you there.
Do you remember this little card that I stamped and coloured with the copics, using that lovely Hero Arts butterfly again?
 Well this is what I turned it into...

 I made this card for Merv's Mum's birthday. A scallop card from Craftwork Cards, some background papers from a Basic Grey paper pad (bought it ages ago) added some punched daisies and a butterfly and stamped message.
I added a bit of paper and some daisies the to inside of the card too.
Its a card in minutes but I like the result and so did she!
Well I have to say .... No one is more surprised than me that I have managed to post everyday now for 3 weeks and sometimes I have even posted more than once a day!
I will really try and keep this up - but there are no promises.
Anyway Week 3 - DONE!
This is the final card that I made from the sheet of stamped and coloured paper.
 I cut around the wings on one of the butterflies from the piece I had left for this card. Layer a piece of pearlescent card behind it so when I lift the wings you will see this coloured card.
I punched some scallop edges from the same pearlescent cardstock and attached to either side of the stamped panel.
Colour the edges of the card using an inkpad, colour and layer up an In Circle message and attach using foam pads.

Up close shot to show the butterfly details.
Well that all 5 cards - which is your favourite? Leave me a comment and I will publish the results in a weeks time.
The other small card that I made using the sheet of stamped and coloured paper.

The little piece I had left from the sheet I cut into 3 slim pieces and spread them over the front of the card. I left bigger borders at either end and added some crystals.
I coloured a Mini Message using the same Copic pens as the butterflies and finished with a crystal at either end. The crystals help to draw your eye to the message.

Up close shot to show the detail better.
Only 1 more card to go - dont forget please vote for your favourite card design.
My 3rd card design using my stamped and coloured paper is one of the big square cards.

I cut a panel up into smaller squares, opened them up and layered them onto pearlescent cardstock then attached them to the base card.
Colour the edge of the card using an inkpad, I always use Versa Magic chalk inkpads to do this as they dry really quickly and give great results especially when I use Softies cardstock. Softies has a slight texture to it and it just looks gorgeous when you ink around the edge of the card.
Again I punched a circle and scallop circle from white cardstock and then coloured them using the same Copic pens as I coloured the butterflies with.
Wrap ribbon around the card, tie a double knot to secure and then add the message attaching with foam pads.

Close up shot showing layered squares and message.
So is this your favourite card so far? Card 4 tomorrow!
This is my 2nd card made using my sheet of stamped and coloured paper - scroll down to yesterdays post to see the paper.
A little card today, just a simple panel of the paper which was layered onto some pearlescent card before attaching it to the base card.
I stamped one of Paula's message stamps and used my oval and scallop oval punches to layer it up.
3 crystals below the message finish the card.
 A close up shot of the colouring and message.My 3rd card tomorrow - dont forget let me know which is your favourite!
Just added the first workshop of the year in Horley to the website, its on Saturday 13th February 2010 at St Wilfrid's Church Hall, Horley Row, Horley, Surrey RH6 8DF.
The workshop starts at 10am through to 1pm is great for both beginners or experienced card makers. You will create some lovely cards using our latest goodies!
We provide tea, coffee and biscuits together with all the materials needed to complete the projects and you can even shop after the workshop.
The cost of the workshop is £13.50 per person, pay a deposit of £6.75 when booking your seat and the balance is payable on the day.
To reserve your place, click here!
You must check out this challenge, set by Craftwork Cards, over the next few weeks they are going to spell out CRAFTWORK using their gorgeous products. The first challenge is C for Card Candy. Simply use Card Candy on your card, send your entry to: info@craftworkcards.com by 22nd January. The winning card will be displayed on their blog for all to see and the designer will receive a gorgeous Card Candy store worth £20!They have listed the rest of the products against the letters on the right hand side of the blog so you can get thinking about the card you will make for the next challenge!Im off to make my card now! Go get busy too and send your card in too!


